Manager Interface
The main manager interfaceFigure 1 just contains links to sub-pages each of which provides a separate management sub-systems: 3 sub-systems that each provide facilities for managing a particular database table (question list, marks and username-passwords; a sub-system for aggregating marks; a sub-system for monitoring users logins; one that displays the student interface; and one that provides a range of miscellaneous functions. There is also a link that logs the user out from the system, although this does not break the SSL coonnection. The table editing sub-systems all have a large number of common features, but each has a small number of table specific functions. The username password system will be described first and will cover all the common table management functions as well as its table specific functions.

Username-password Table Sub-system
The main page for this sub-system is shown in Figure 2. The page has 2 frames. The large frame, the table frame, displays the data in the table by records in rows. Only the first 100 or so records are displayed, but the display can be changed from the command frame, which is the lower frame on this page. The commands in this last frame provide facilitied for selecting, copying, deleting, pasting, sorting, creating and editing of records of the table; they allow the records shown to be changed; for import and export of the records displayed; for saving the table to the database; for generating passwords; for mailing usernames and passwords to users. These are discussed in the following sections with the common functions available on all table subsystem pages (question list, marks) being discussed first.
When the sub-system is opened the records of the table are read in from the database and stored. All subsequent activities operate on the stored records and any changes to these records are only committed to the database when a "Save to Database" command is executed. Changes to the stored records can be discarded without saving to the database by closing the sub-system via the close command and following the instructions.

Selecting records
There is a record selection mechanism so that records can be identified for various other commands, e.g. deleting, copying, sorting. The mechanism for identifying a record or records depends on the "select" links at the start of each record in the table frame: clicking on the link triggers a selection action. The selection action depends on the current selection mode of which there are 3:-
- exclusive selection
This mode is set by clicking on the "exclusive" command link in the command frame. In this mode, only one record can be selected at any time: clicking on a "select" link selects that record and removes all other selections. Clicking on the "exclusive" command link clears all current selectins. This is the default mode.
- block or group selection
This mode is set by clicking on the "group" command link in the command frame. In this mode, a single block of records is selected and selection is a 2 stage process: the first stage requires the clicking of the "select" link of the record that is one end of the block; the second stage requires the clicking of the "select" link of the record that is other end of the block. This selects the end records and all intermediate records. Clicking on the "group" command link clears all current selections.
- inclusive selection
This mode is set by clicking on the "inclusive" command link in the command frame. In this mode, multiple non-consecutive records can be selected at the same time: clicking on a "select" link selects that record but leaves all other selections. Clicking on the "inclusive" command link leaves all current selections active. This mode is the least useful im my experience.
There is one command link that is quite useful for selection and this selects all the records in the table. This action is performed by clicking on the "SelectAll" link in the command frame. In the standard system, all the command links for selection actions, except the "select" links, are in column one in the command frame.
Row Display Functions
The default behaviour is only to display in the table frame a fixed number of records from the start of the table, where the fixed number is definable via initialisation parameters. If the table has fewer records than this, all the table is displayed. The top line of the tabel frame indicates the records displayed and the number of records in the table. This mechanism can be unnerving when one expects a vary large table to displayed, e.g. the marks table, and there are only a 100 or so displayed. The purpose of the mechanism to reduce the time to display the records: displaying a table with several thousand records takes some time as they all have to be transferred from the server to the client. Generally, one does not want to look at all the records in the table.
The functions for changing the displayed records are in column 2 of the command frame in the default system, and there are links to 3 functions:-
- changeDisplay
Clicking on this link overwrites the record display in the table frame with a form for changing the records displayed. There are several possibilities for changing the display chosen by the entries on the pull down menu of the first box of the form: first or last 10, 20 or 30 records, all records, no records, or "bounded", where the first and last records to be displayed are selected by typing in the record numbers into the other to form boxes. The default mechanism on loading a table is "bounded". Clicking on the "ChangeDisplay" button on the form makes the changes, and redisplays the table records with the records displayed changed appropriately. The "Cancel Display Operation" does as expected, redisplaying the records of the table without changing the records displayed.
- displayAll
Clicking on this link changes the display to show all the records in the table: a slow process if the table is large.
- hideAll
Clicking on this link changes the display so that no records are shown, just a comment on the display mode "Hide All" and the number of records in the table.

Cut and Copy Functions
These commands work on the currently selected records in the table frame: no error is flagged if no records are selected when either command is executed.
The "Cut" command cuts any selected records in the table frame from the records storeand puts them into a Cut Buffer. These records are appended to the records in already placed in the cut buffer. Records appended into the cut buffer are "selected" and added to the set of currently selected records which can be accessed directly with the paste commands.
The "Copy" command does almost the same as the "Cut" command: the selected records in the table frame are appended into the cut buffer, where they become part of the set of the selected records, but the original records are not cut from the records store.
Cut Buffers and Cut Buffer Functions
A "Cut Buffer" is where copied or cut records are placade. It is in fact identical in structure to the "records store", where records are placed when loaded from the database. The records in a cut buffer can be examined, edited and otherwise worked on, in exactly the same way as the records in the main record store by clicking on the "Show Cut Buffer" command that appears in the command frame once a "Cut" or "Copy" has been executed: see Figure 5. Clicking the "Show Cut Buffer" link command throws up a new window identical to the current window, i.e. it has a table frame and a command frame, except that the records displayed in the table frame are just those in the cut buffer: see Figure 4. The records in the cut buffer can be operated on in the same way as those in the main record store. Cut and copy operations on these records are moved/copied to yet another "Cut Buffer", which can naturally be displayed and edited as well, although this is unlikely in my experience. This mechanism allows for flexibility in editing tables. It is not possible to write to the database from a cut buffer only from the main table window.

It should be noted that cutting and copying records to a cut buffer does not remove the previous records in the cut buffer, but appends them to the end of the buffer. A cut buffer can be cleared by clicking on the "Clear Cut Buffer" link on the command frame at the next level up, i.e. clicking this link on the top level page which first appeard with the records from the database clear the cut buffer for this page. The "Clear Cut Buffer" link only appears in the command frame once a "Cut" or "Copy" has been executed.

Paste Commands
There are 3 paste commands. All of these copy the currently selected records in the cut buffer for this window into the record store associated with this window. Note: the selected records in the cut buffer will normallu be all the records placed in the cut buffer, unless some processing of the cut buffer has occurred: see the Section called Cut Buffers and Cut Buffer Functions. The actions of the paste commands varies depending on the record selection in the table frame. The paste commands are:-
- Paste-Before
If there is a single record selected in the table frame, the currently selected records in the cut buffer are copied immediately before this record in the record store.
If there is no record selected, the currently selected records in the cut buffer are copied before the first record in the record store.
If there is more than one record selected, the command fails with an error message: see Figure 6. Clicking on the "continue" link on this error display redisplays the records unchanged.
- Paste-After
If there is a single record selected in the table frame, the currently selected records in the cut buffer are copied immediately after this record in the record store.
If there is no record selected, the currently selected records in the cut buffer are copied after the last record in the record store.
If there is more than one record selected, the command fails with an error message: see Figure 6. Clicking on the "continue" link on this error display redisplays the records unchanged.
- Paste-Over
The currently selected records in the record store are over-written. If there are no records in the current selection, the selected elements in the cut buffer are appended to the records in the record store.

Sort Function
Clicking on the "Sort" link causes the current set of records in the record store to be sorted depending on the contents of a specified field. The first action on performing a sort is for a form to be thrown up so that this field can be selected via a drop-down menu with the names of the fields in the table.
The action does not modify the order of the records in the table only the order in the record store and a Save-To-Database must be done to save the new ordering, if desired.
New and Edit Functions
These commands create a new record or edit an existing record. There operation, in particular the user interaction, is very similar, as the operation of "New" is to create a new record, usually by copying an exisitng record, and then editing this new record in the same way as "Edit". The creation of the new record for "New" is covered first, and then the edit operation is then explained.
The operation of "New" depends on the current record selection in the record store:-
- No records selected
If there is no record selected, a new record is created with no fields initialised and the record is placed at the end of the record store.
- Single record selected
If there is a single record selected in the table frame, this record is copied and this copy is inserted before the selected record. The fields of this new record are a copy of those in the selected record.
- More than one record selected
If there is more than one record selected, the command fails with an error message: see Figure 7. Clicking on the "continue" link on this error display redisplays the records unchanged.

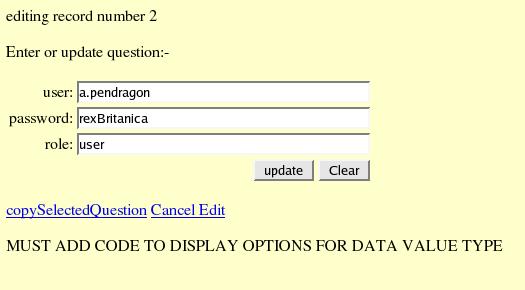
Clicking on the "Edit" link only succeeds if there is a single record selected in the record store otherwise an error message is displayed: seeFigure 7. If there is a single record displayed, the fields of this record are displayed in an "edit" form.
An edit form is shown in Figure 8. The fields of the form can be edited as required. If it is desired to clear all the fields, this can be done via the "button". If it is desired to copy the contents of an existing record, then the record to be copied should be selected in the table frame, and then the "copySelectedRecord" link clicked on. Once the editing has been completed, clicking the "Update" link stores the contents of the form into the record being edited, and replaced the form with a message and a "Refresh" button to refresh the display of the records in the table frame. This "Refresh" action does not update the display in the table frame, since the edit form and the table frame cannot both be changed by the "update" command: see the paragraph on the limitations of using just html.
Note: the edit form window is not closed automatically and has to be manually deleted. If it is not deleted, but merely iconised or hidden behind others, subsequent edit operations may appear to be "lost", as the same window will be re-used. Deleting the window causes window re-creation and display at the front of the screen on the next edit operation.
Load-from-file Function
Clicking on the "Load-from-file" link causes the current set of records in the record store to be discarded, and a new set of records to be loaded from a file. The format of this file is the "comma-separated-format (.csv)" created by Microsoft Excel and other spreadsheets, although the separator character can be other than comma.
The action on clicking the "Load-from-file" link is the display in the table frame of a file selection form (see Figure 9). This form allows the traversal of the directory structure downwards from the "WEB-INF" directory of the application with the Tomcat directory structure to locate the file to be loaded. At any point in the traversal of the directory structure, there is always a currently active directory. The pull down menu on the top field in this form shows the directories in the currently active directory, including the link ".." to the upper directory, unless the current active directory is WEB-INF. The pull down menu on the second field in the form shows the files held in the active directory. The figure shows the form after descent thorugh the directory structure and the selection of a file.
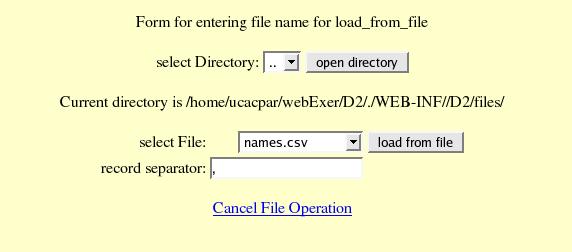
The active directory can be changed by making a selection from the directories shown in the drop-down menu on the top field and then clicking on the "Open Directory" button, when the form will be changed to reflect the changed active directory. Once the appropriate directory has been located, the file to be located can be selected using the drop down menu on the second field. The field separator must also be typed into the third field of the form. Clicking on the "Load-from-file" button cause a confirmation page to be displayed, see Figure 10. Clicking on the "Confirm" button will then read the file and create a new set of records. The new records can be written to the database, over-writing any existing records with the the Section called Save-to-Database Function

If the separator character is not entered, an error will be flagged and the form can be redisplayed to enter this character. If the wrong separator is used, the file will be read and records created, but the fields will be incorrect. This cannot be prevented, because there is no mechansim to identify that the separator is incorrect in all cases, and the user can see that problems have occurred by checking the new records.
This function is very useful in the initial construction of tables. I use it regularly to load in a list of user names for a course, generated elsewhere, to produce a set of user records which I add passwords and roles via the table specific commands for the username-password sub-system. This function also eases the addition of new question records to the question list table: the records can be generated elsewhere, the question list table is displayed and an empty cut buffer created (do "copy" with no records selected), show the cut buffer display with "Show Cut Buffer", load in the new question records with "load-from-file", select all the records in the cut buffer, switch back to the top level question list display and use "paste-after" to copy the question records from the cut buffer to the end of the record store, save the records to the database. Note: I think that it is time to add a "append-from-file" function.
Save-to-file Function
Clicking on the "Save-to-file" link causes the current set of records in the record store to be written to a file. The format of this file is the "comma-separated-format (.csv)" created by Microsoft Excel and other spreadsheets, although the separator character can be other than comma.
The action on clicking the "Save-to-file" link is the display in the table frame of a file selection form (see Figure 11). This form allows the traversal of the directory structure downwards from the "WEB-INF" directory of the application with the Tomcat directory structure to locate the directory to save the file. At any point in the traversal of the directory structure, there is always a currently active directory. The pull down menu on the top field in this form shows the directories in the currently active directory, including the link ".." to the upper directory, unless the current active directory is WEB-INF.

The active directory can be changed by making a selection from the directories shown in the drop-down menu on the top field and then clicking on the "Open Directory" button, when the form will be changed to reflect the changed active directory. Once the appropriate directory has been located, there are 2 possibilitied: to write the records to a new file or to overwirte an existing file in the directory. For each of these choices, there is a set of input controls: 2 input boxes and a "Save to File" button. The set below the directory selection controls allows for overwriting existing file in the directory: there is a drop down menu on the first field of the set to select the filename, and the field separator must also be typed into the second field of the set. The lower set of controls allows a file name to be entered, and again the input of the field separator between the fields of each record in th eoutput file. Clicking on one "Save-to-file" button will save the records to the file. Various error displays will appear if a filename or field separator charactor is not entered. There is a cancel button.
Save-to-Database Function
Clicking on the "Save-to-Database" link causes the current set of records in the record store to be written to the database. Instead of just deleting the existing reords in the database, these records are saved to a backup table. The process by which this is done depends on the database used. If Mysql is the database used, "Save-to-Database" causes first a new table to be created and the records in the record store to be written to this new table. A Mysql "rename" operation is then performed, so that the new table gets the name of the existing table, and the existing database table is renamed with the prefix "old_". This action is performed atomically, so that the possibility of an error occurring and leaving the database with no table is reduced.
Show-Cut-Buffer Function
This is described in detail in the section on Cut Buffers.
Clear-Cut-Buffer Function
This is described in detail in the section on Cut Buffers.
Refresh Function
Clicking on the "Refresh" link causes the table frame to be refreshed. This is useful to ensure that the table frame display is up to date on "edit" operations, for example. Due to the way that html links work it is now always possible to update the table display on every action.
Close Function
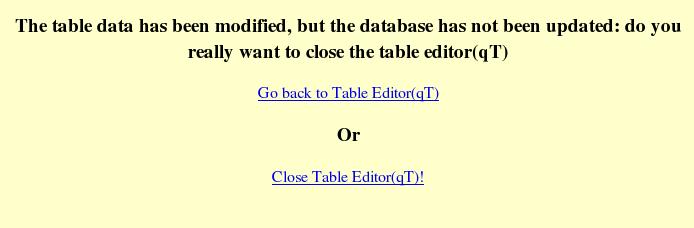
Only one active sub-system is allowed when running the management system. In order to move to another sub-system, the current sub-system must be "closed". This function does this. On clicking on "Close", the top level management page should be displayed. The exception to this is when the records in the record store differ from those in the database table, e.g. by editing, deletion, etc., when a warning is displayed and a choice is given of going back to the table display or continuing to the top level display with the discarding of the changes to the table, see Figure 12.
AddPassword Function
This command is specific to username-password table. Clicking on the "AddPassword" link causes the passwords to be generated for the set of records currently selected on the record store: see the Section called Selecting records The password generation mechanism randomly selects 2 words of length 4 characters or more from a dictionary (see Dictionary File), and combines the first 4 letters of each word. I usually scrutinise the passwords so generated to replace any that might seem objectionable.
The action does not modify the records in the table only those in the record store and a Save-To-Database must be done to save the passwords.
Of course, passwords can be manually entered through the Edit and Edit functions, but this is generally a quicker way of doing this, particularly when usernames have been loaded from a file with the the Section called Load-from-file Function. I usually use a different password to a users system password because of concerns over the security of the Mysql database.
Currently the usernames and passwords are not encoded when stored in the database, although this is certainly a possibility with Mysql. The implications of encoding have not yet been considered.
There is currently no mechanism by which students can change their password. This is primarily due to concerns of the security of the system and the consideration that users might use their system password.
AddRoles Function
This command is specific to username-password table. Clicking on the "AddRoles" link causes the role name "user" to be placed in the role field of the records currently selected in the record store: see the Section called Selecting records. Only "user" can be added automatically, while the roles "manager" and "lecturer" must be added manually. This latter are rarely performed and so the task is not onerous.
The action does not modify the records in the table only those in the record store and a Save-To-Database must be done to save the passwords.
Of course, roles can be manually entered through the Edit and Edit functions, but this is generally a quicker way of doing this, particularly when usernames have been loaded from a file with the the Section called Load-from-file Function.
MailPasswordsToUsers Function
Clicking on the "MailPasswordsToUsers" link causes e-mail messages to those users whose records are currently selected in the record store: see the Section called Selecting records. The e-mail messages are specific to each user, and carry the users username and password. To send e-mails to all users, use the the Section called Selecting records to select all the records in the record store before clicking on "MailPasswordsToUsers".
Sending only to selected users allows for users who lose their passwords to be reminded of them: a surprisingly number have their disks wiped or manage to delete their e-mails by mistake.